
Harlequins Review: Cegorach Gets the Last Laugh
Introduction and Agenda
Hey all, Bmoy and Brian Tabata here and today we are going to discuss our thoughts on the gifts that Cegorach has bestowed upon our precious clowns in GW’s latest Psychic Awakening release. We don’t typically publish our thoughts until GW officially releases their content, but given the Warhammer Community Previews and wanting to share our thoughts with the wider community, we felt it was “ok” to release our review article.
We have been playing Harlies for many editions now and I have included Harlequins (or Ynnariquins) detachments in the majority of my armies in 8th edition. Brian (Tabata) has also played Harlequins as his secondary army and together we are extremely excited to apply all of the new toys we’ve received in the latest Psychic Awakening rules.
Let’s set the tone for this article.
- Overview and Initial Thoughts
- Pivotal Roles
- Stratagems
- Relics
- GDFC Strategies and Builds (and other typical builds)
- Closing Thoughts
Overview and Initial Thoughts
Key Strengths: Movement, JANK aka: utility and shenanigans, combat damage output, soup, TOOLS
Key Weaknesses: CP Hungry, lack of ranged damage output, durability, lack of mono-faction army builds
Overall, we couldn’t be more excited for these rules. The rules feel fluffy and augment the Faction’s primary playstyle. Many of the rules double down on the Harlies’ strengths but also help address some of their current weaknesses. Brian and I have been experimenting with lists that feature large Troupe units and we definitely feel this will be a viable build going forward. We dive into our strategies and builds toward the end of the article in the GDFC Strategies and Builds section.
Harlequins are already the most mobile army in 40k today, and also one of the “jankiest” armies with movement shenanigans, unique stratagems, and a plethora of “tools” that impact the game in very unique ways. Some of the new stratagems lend even more flexibility to an army that has a ton of utility such as The Curtain Falls, Virtuosos of the Webway, and Polychromatic Storm. Additionally, a few of the strats namely The Foes of the Mind increase the overall durability of the army.
In many ways, Harlequins feel like Ynnari 2.0 with their janky movement shenanigans that allow us to hit and run, fight twice, and other various ways to clown our opponents.
Pivotal Roles
While each Pivotal Role ability for models in your army must be different, they go a long way to providing increased utility and open up different builds/roles for key units. In many aspects, with the impact these abilities can have on the battlefield, they are as powerful, if not more so, than Warlord traits.
Troupe Master
The Choreographer of War ability is the default ability which provides Harlequins with the ever important access to rerolls to wound in combat. The Troupe Master may be one of the key units that you will consider spending 1 CP on the Pivotal Role stratagem that allows a Troupe Master, Shadowseer, Death Jester, or Solitaire model to gain an additional Pivotal Role.
Prince of Light: While a friendly <Masque> unit is within 6″ of this model, you can re-roll charge rolls made for that unit. If you could already re-roll charge rolls made for that unit, add 1 to that charge roll instead.
• Rating: 4/5
• Use: Very powerful ability, especially if taken with The Warlord Trait: Player of the Light which allows you to re-roll failed charge rolls. Can be extremely useful when deploying Troupes or other units from reserves giving you an 8″ charge which is a 41.67% odd of success and increases it to 66% with rerolls or 72% if choosing between two dice. As an army that lives or dies on the charge, more reliability, more better.
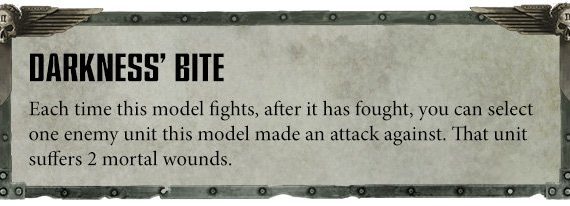
Darkness’ Bite: Each time this model fights, after it has fought, you can select one enemy unit this model made an attack against. That unit suffers 2 mortal wounds.
• Rating: 3.5/5
• Use: Very powerful ability that helps dial your TM to 11 and makes him a Solitaire-light character assassin. Couple this with the Twilight Fang and you have a beatstick.
Twilight’s Grasp: Each time a melee attack is made by this model against a unit that is not a Monster or Vehicle, an unmodified wound roll of 2+ is always successful.
• Rating: 3/5
• Use: Can be very useful for making your TM a beatstick unit. The obvious limitations against Vehicles, Monsters, and the TM’s Choreographer of War ability makes this a little unnecessary, but it can still be useful in the right situation. Overall re-rolling 3+ to wound beats a 2+, but if you are facing a lot of Centurions or Custodes it can be great!

Shadowseer
The Shadowseer is one of our best units and also provides significant utility and defense. PA has provided additional flexibility making the Shadowseer a must-take in any Harlequins army. The Shadowseer is another candidate for the 1 CP Pivotal Role stratagem, as the Shadowseer’s default Shield From Harm ability offers great durability by subtracting 1 from wound rolls for attacks made against friendly <Masque> INFANTRY. Coupled with the new stratagem The Foes of the Mind which extends the shield to all Harlequins units, our clowns suddenly received a big boost to overall durability.
Veil of Illusion: While a friendly <Masque> unit is within 6″ of this model when determining if that unit is within range of attacks made by enemy models with ranged weapons, add 6″ to the distance measured. For example, if this unit is 22″ away from an enemy model, for the purposes of shooting, it is treated as being 28″ away. Note that for the purposes of determining if a model is at half range, it is the distance after applying the effects of this ability.
• Rating: 4/5
• Use: Veil of Illusion is the winner here. This ability can be extremely useful for protecting your units, especially when going second. With the prevalence of 24″ ranged weaponry, this allows for the Clowns to deploy outside of traditional threat ranges and then respond in our turn. As most of your opponents will boast a 30″ threat range, deploying your Sky and Starweavers 30.1″, could potentially leave you with that 8-9″ charge after moving and advancing. Many opponents will be forced to give up positioning and overextend in order to get some shots into your army, which ultimately can make it easier for you to deal with them piecemeal. With Twilight Pathways, you could get into the heart of your opponent with more assurance. Additionally, your units will mitigate some damage from all of the deadly rapid-fire weapons that exist in the game today. The only drawback is that this ability will typically only be useful Turns 1-2, which may be all you need to get into your opponent’s lines taking minimal casualties. This ability works in all phases, including overwatch. This can be helpful in ignoring those painful autohit flame weapons that are incredibly dangerous for us. There are even more uses when using Heroe’s Path to potentially mess with your opponent’s pre-measuring and screwing with their target priority. There are a lot of applications for this one that we are big fans of.
Gloomwake: While a <Masque> unit is within 6″ of this model, each time a ranged attack is made against that unit, models in its unit gain the benefit of cover to their saving throw.
• Rating: 2/5
• Use: As Skyweavers and Harlequin vehicles come with a native 4+ save, this brings them up to a 3+ save. Situationally useful but there are usually better options.
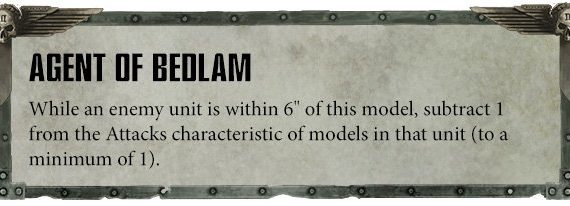
Agent of Bedlam: While an enemy unit is within 6″ of this model, subtract 1 from the Attacks characters of models in that unit (to a minimum of 1)
• Rating: 3/5
• Use: Could be helpful in keeping your troupes alive from Space Marine Counter attacks. However, most Spiritseers would consider being within 6″ of enemies too close for comfort. This is incredibly powerful in giving you the edge against other melee armies, making it difficult to charge into your Troupe squads.
Death Jesters
Personally, I’ve always been incredibly fond of Death Jesters. I tend to use them as backfield objective holders that are protected by the character keyword. The Death Jester Pivotal Roles are probably some of the best of the bunch. The default Death is not Enough ability is situationally useful but easily replaceable by any of the below Pivotal Roles (with Humbling Cruelty being the best)
Harvester of Torment: Each time this model shoots, if the target unit contains 6 or more models, each successful hit roll scores 3 hits instead of 1. This is not cumulative with any other rules that cause additional hits.
• Rating: 4/5
• Use: Obviously good against hordes but also useful when combined with the new relic cannon. The wail profile does D3 mortal wounds and -2 leadership for each model slain. Dropping a couple of Intercessors from a large group can have devastating effects.
The Jest Inescapable: Add 12″ to the Range characteristic of ranged weapons this model is equipped with. Each time this model shoots, an unmodified wound roll of 6 inflicts 1 mortal wound on the target in addition to any normal damage and the target does not receive the benefit of cover to its saving throw.
• Rating: 3.5/5
• Use: This can become very handy if you’re primarily using your Death Jester as a backfield objective holder. This allows him to chip in some wounds and enhances his overall output. Death Jesters will pose a serious threat to characters now that a relic Shrieker Cannon is available to all Masques. Combine this, Shrieking Doom, and Aeldari’s plethora of targeted smites and you have some serious character removal power.
Humbling Cruelty: Each time an attack made by this model against an enemy unit scores a hit, that unit is pinned until the start of your next turn. While a unit is pinned, subtract 2″ from the Move characteristic of models in its unit and it cannot fire Overwatch.
• Rating: 5/5
• Use: Always. Holy moly. This is the stand-out pivotal role for me. The fact this ability works on a hit roll makes it very reliable and can be huge in opening up new builds and protecting your clowns from all the nasty Overwatch that exists. The other nice combo here is with Twilit Encore. Reducing your opponent’s movement by 2″ means that your opponent needs 10″ movement or else you will be able to keep your Troupes locked in combat to keep them protected from shooting or tie up a potentially dangerous shooting unit. Super. Powerful.
However, keep in mind that Tau can still pass the pinning effect off to drones from the latest FAQ, so there is still a strong argument for the Silken Knife Stratagem.
From the Tau Codex Errrata:
Q: If an attack inflicts a rules effect on a target unit (e.g. Tremor Shells in Codex Space Marines), and that attack is subsequently allocated to a Drones unit as a result of the Saviour Protocols ability, which unit is the rules effect applied to? A: The Drones unit.
Keep in mind Tremor Shells applies their slow as an “on hit” effect, so I would expect this to be ruled the same way.
Solitaire
The Solitaire has always been one of my favorite units of any of the Aeldari factions. She provides a very unique role, not unlike Smash Captains for the Imperial Factions, but is the ultimate character assassin and can really apply pressure on unsupported elements of your opponent’s army. The mind buggery, counter assault element, and incredible movement are all key elements to making this 98 point unit a must-take in any Harlequins (or Aeldari) army.
The Solitaire’s Blitz ability is an incredibly strong default ability that allows you to add 2D6″ to your movement and increases Attacks to 10, but there may be situations where you want to replace it with one of the below Pivotal Roles. However, in the way that I like to play the Solitaire, it makes more sense to start her on the board, in a position to counter-assault or apply pressure while trying to position her to take out some key enemy characters.
Shocking Emergence: During deployment, you can set up this model shimmering instead of placing it on the battlefield. If you do, then at the end of one of your Movement phases you can set up this model anywhere on the battlefield that is more than 9″ from any enemy models. Each time a charge roll is made for this model if it was set up on the battlefield as reinforcements this turn, roll one additional D6 and discard one of the dice.
• Rating: 2.5/5
• Use: This is an interesting option, but is actually more limiting in application as you are at the mercy of your opponent’s zoning. With a Player of Light/Prince of Light nearby the Solitaire will make the charge 89.8% of the time. I think this is most useful against armies that really want to spread out all over the board in more isolated pockets. This would let your Solitaire more consistently bounce around using Virtuosos of the Webay.
Chromatic Rush: When this model Advances, do not make an Advance roll. Instead, until the end of the phase, add 6″ to the Move characteristic of this model. Each time this model piles in or consolidates, it can move an additional 3″.
• Rating: 3/5
• Use: Movement wins games and if you’re running a Midnight Sorrow Solitaire, you’re ostensibly at a 6″ pile-in and 9″ consolidate move. While that’s probably overkill, there are tons you can do with guaranteed 18″ movement from a model on a 25mm base. I would still keep Blitz but there could be some play here. I see this being most useful when you need to tag some non-flying heavy weapons. Equip the Solitaire as more of an infantry slayer (use Destiny’s Jest to make his Caress S6 and he will destroy some Guard) to wipe screens and stop the heavy artillery.
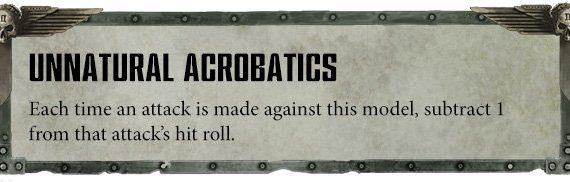
Unnatural Acrobatics: Each time an attack is made against this model, subtract 1 from the attack’s hit roll.
• Rating: 3.5/5
• Use: Obviously -1 to hit is fantastic, especially since it applies to shooting and melee. The other application is with the relic Suit of Hidden Knives which can get you to -4 or even -5 to hit (Lightning Fast Reflexes, Veil of Tears, Fog of Dreams, Unnatural Acrobatics, and the Rune of Battle power Drain – which still works cross-faction) for some Mortal Wound jank. I don’t feel that this is worth replacing Blitz, but is it worth 1CP for the additional role? Maybe. I think this will depend on your build, how many CP you start with, and how you’ve budgeted your CP for your overall game plan.
Stratagems
Broken. Filthy. Janky. Groan-worthy. Ynnari 2.0. Just a few words that come to mind when assessing the new Harlequin’s stratagems. Honestly, in our playtesting, we’re finding some of these combos to be game-winning, back-breaking, and we wouldn’t be surprised to see some “nerfs” in the near future. All that being said, I could not be more excited about how these positively impact Harlequins and Aeldari armies.
Top-Tier Stratagems:
The Curtain Falls (2CP): Use this Stratagem in the Fight phase, when a HARLEQUINS unit from your army would consolidate. Until the end of the phase, instead of consolidating that unit can Fall Back or move as if it were your Movement phase (but cannot advance).
• Rating: Bonkers 5/5
• Use: Always. Head and shoulders the best stratagem Cegorach has gifted us. If this were the only stratagem in the 6 pages, that would be enough. Additionally, if this was omitted, the rest of the book would still be amazing. If you’re in the GDFC Discord, then you’ve heard Brian and I rave about this for days now. The ability to attack and mitigate any return attacks by bouncing away is tremendous. The other application with War Dancers to fight twice can be absolutely back-breaking for your opponent. We’ve been testing this primarily with a large 12-model squad of Troupes but Skyweavers and even the Solitaire can make great use of this ability. Skyweavers can use this as a more effective Fire and Fade and makes them the ultimate skirmishers. Troupes can use this to decimate their initial target, stay an inch away from their secondary or tertiary target, fight again, and then bounce behind cover OR utilize a normal consolidation to get a nice wrap off. Oh, and if you fail the wrap, you have access to another wonderful stratagem Twilit Encore (potential spelling error on this one, but only Cegorach knows). There are so many applications for this stratagem and I would budget 4-6 CP off the bat to use this for 2-3 turns and 3CP for War Dancers for a key fight twice. There’s really not enough we can say about this one, but this is going to leave people feeling salty ala the days of yore when old school Ynnari roamed the land.
Twilit Encore (1CP): Use this stratagem in your opponent’s Movement phase, when an enemy unit within 1″ of HARLEQUINS TROUPE unit from your army Falls Back. After that enemy unit has moved, that HARLEQUINS TROUPE unit can consolidate up to 6″. Each model in that HARLEQUINS TROUPE unit must end that move closer to that enemy unit or the nearest enemy model.
• Rating: 4.5/5
• Use: Combine this with Humbling Cruetly, and all of a sudden your opponent needs 10″ movement to escape being locked in combat. Extremely powerful, especially for 1CP.
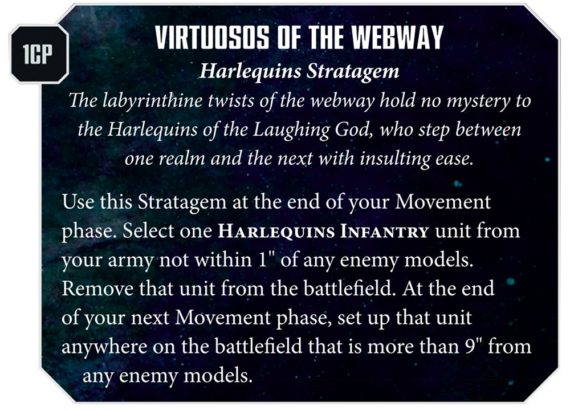
Virtuosos of the Webway (1CP): Use this Stratagem at the end of your Movement phase. Select one HARLEQUINS INFANTRY unit from your army not within 1″ of any enemy models. Remove that unit from the battlefield. At the end of your next Movement phase, set up that unit anywhere on the battlefield that is more than 9″ from enemy models
• Rating: 4/5
• Use: Lots of applications for this one, but we feel the big brain play here is in conjunction with a dual Light Troupe Master (Player of the Light and Prince of Light) to get your Troupe Master in position to support your assault elements. One of the more challenging aspects of playing Footquins in general, is keeping your forces supported. It’s fairly easy to out pace your Troupe Master with Twilight Pathways or Warrior Acrobats. Now you can simply pick him up and place him 9″ away from an enemy but close enough to provide aura support to your army. This can also be used to safely pluck an infantry unit up and stow them away to steal an objective, secure recon, or score behind enemy line points.
Foes of the Mind (2CP): Use this Stratagem at the start of the Shooting or Fight phase. Select one SHADOWSEER from your army. Until the end of the phase, that model’s Shield from Harm ability affects friendly <MASQUE> units, not just friendly <MASQUE> INFANTRY units.
• Rating: 3.5/5
• Use: Significantly increases the durability of your army and will likely see the biggest impact Turn 1/2. This isn’t something you want to spam every turn, but it can be powerful when used at the right moment.
Situational Stratagems
Pivotal Role (1CP): Use this Stratagem before the battle. Select one TROUPE MASTER, SHADOWSEER, DEATH JESTER, or SOLITAIRE model from your army. That model gains one of their respective Pivotal Role abilities. This does not replace an existing ability. Each model from your army can have no more than one Pivotal Role ability, and each Pivotal Role ability models in your army have must be different.
• Rating: 3/5
• Use: As it doesn’t state a once per game limit, you could use this multiple times. However, since Harlequins will be bleeding CP, you’ll want to think long and hard on when/where you want to use this. I think the dual light Troupe Master, Shadowseer with Shield from Harm, and Veil of Illusion make the most compelling cases but there are situational uses for the Death Jester and Solitaire as well.
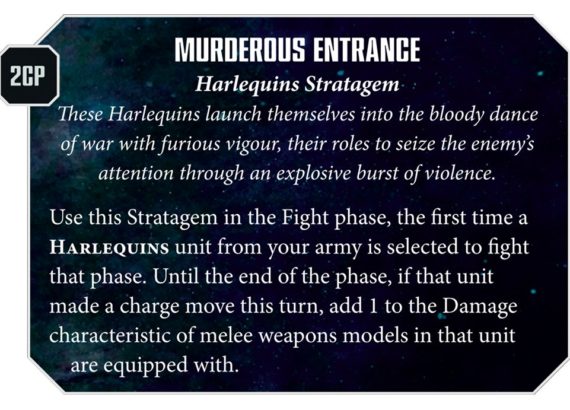
Murderous Entrance (2CP): Use this Stratagem in the Fight phase, the first time a HARLEQUINS unit from your army is selected to fight that phase. Until the end of the phase, if that unit made a charge move this turn, add 1 to the Damage characteristic of melee weapons models in that unit are equipped with.
• Rating: 3/5
• Use: This can be a very useful stratagem to allow your combat units to deal with vehicles, titanic units, and other big nasty scary things out there with volume of attacks that boast decent damage. This also ups the value of the Caress and Embrace a bit as well. 2CP is a heft investment but certainly a valuable tool to have with all the multi-wound, high toughness units that roam the battlefield.
Mythic Role (1CP): Use this Stratagem before the battle, if your army includes a SHADOWSEER. Select one AELDARI unit from your army. Each time that unit is chosen to shoot or fight, you can re-roll one hit roll or one wound roll for those attacks. You can only use this Stratagem once.
• Rating: 2.5/5
• Use: As if there were any doubts that Harlequins were meant to be a “souped” faction. As it applies to any Aeldari unit there are some interesting uses here. Phoenix Lords, Avatar of Khaine, Wraithknights in a super heavy auxiliary detachment, Ilic, Voidraven Bombers, unit of Talos perhaps, Death Jester or even a Solitaire would welcome the reroll support. Sadly, Ynnari are excluded as non-Ynnari stratagems cannot apply to them.
Eye of Damnation (1CP): Use this Stratagem when a SOLITAIRE unit from your army is destroyed as a result of an attack made with a melee weapon by an enemy model. That model’s unit suffers D3 mortal wounds. This Stratagem cannot be used in conjunction with the No Price Too Steep Stratagem.
• Rating: 2.5/5
• Use: Allows Solitaires to consider Masques other than Midnight Sorrow to try and guarantee that she kills whatever it is that killed her. This opens up some play for Frozen Stars Solitaires in particular.
Polychromatic Storm (2CP): Use this Stratagem at the start of the first battle round, before the first turn begins. Select up to three HARLEQUINS units from your army that are on the battlefield. Remove them from the battlefield and set them up again. When setting them up, you can use any abilities or Stratagems that would allow them to be set up in a different location during deployment (e.g. Webway Assault). If both players have abilities that redeploy units, roll-off: the winner chooses who redeploys their units first. You can only use this Stratagem once.
• Rating: 3/5
• Use: Harlequin’s version of Phantasm which is less useful these days due to the attacker/defender style of deployment. Still useful in case you completely botched your deployment, want to try and play mind games to force deployment mistakes on your opponent, or decide you really need to move a key unit into the webway. This is less useful for ITC, but gives Harlequins a defensive tool for when they get seized on in other formats.
Relics
The Shadowstone: SHADOWSEER model only. Add 3″ to the range of the bearer’s aura abilities. Add 3″ to the range of psychic powers completed by the bearer.
• Rating: 4/5
• Use: In my opinion, The Shadowstone is almost a must-take as the Shadowseer’s abilities and psychic poweres are incredibly powerful. Movement wins games, and the ability to extend her ability to impact the game through powers like Twilight Pathways or even targetable smites like Shards of Light is very powerful. If you opt to spend the CP on Pivotal Role, then it’s usually wise to increase the benefits of the seer’s protective auras.
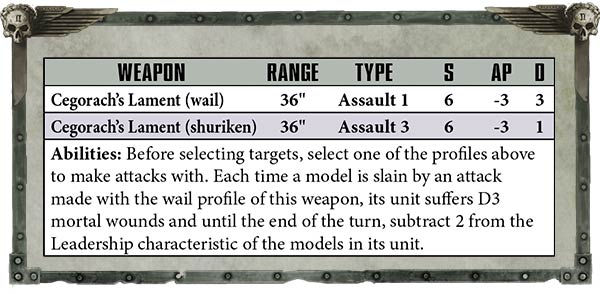
Cegorach’s Lament: Death Jester model only. Cegorach’s Lament replaces a shrieker cannon and has the above profile.
• Rating: 3.5/5
• Use: Another solid cannon option that I’d rate slightly higher than its predecessor, Curtainfall. The 36″ range on the weapon is fantastic and really makes the Death Jester a threat for character sniping with abilities like An Example Made, and the new pivotal roles. The expanded range goes a long way to ensure you can target a key enemy unit for the Humbling Cruelty Pivotal Role ability to go off. Harvester of Torment has interesting synergy with the Wail profile since the D3 mortal wounds and -2 leadership are per model slain. This can become a serious threat to bigger groups of elite infantry.
Twilight Fang: Troupe Master model only. The Twilight Fang replaces a Harlequin’s Blade or power sword and has the following profile:
Range: Melee Type: Melee S: +2 AP: -3 D: 2
Abilities: Each time the bearer fights, it makes a number of additional attacks with this weapon equal to the current battle round number.
• Rating: 3.5/5
• Use: Increases the Troupe Master’s attack to 6 – 11 (approaching Ragnar levels of attacks) depending on the battle round and makes him an absolute beatstick. I really like the Troupe Master with the double light setup, but there’s also a ton of value of having a “Smash Master” that can put out a ton of quality attacks and with the Darkness Bites or Twilight’s Grasp pivotal role, you have quite the duo with the Solitaire that is incredibly mobile and can apply a ton of pressure but also make very effective counter-assault units. Characters in general power up in the later rounds of the game as the board starts to clear, and this really lets you leverage that fact.
Veil of Tears: Once per turn, the first time a saving throw is failed for the bearer, the saving throw is treated as being successful
• Rating: 2.5/5
• Use: Can be useful when you need a character to tank damage but much more situational.
Domino Shroud: Once per battle, at the end of any phase, if the bearer was not set up on the battlefield as reinforcements this turn, they can use the Spectral Apparition. If they do, place a marker within 12″ of the bearer, the en remove them from the battlefield and set them up again within 1″ of the center of the marker and more than 1″ from any enemy models. The bearer is not eligible to charge in a turn in which it was set up in this manner, although the bearer can use this Relic in a turn in which it charged.
• Rating: 2.5/5
• Use: Some potential jank here. A very situational relic that can be used in various applications. There are some cool uses here that could prevent your opponent from gaining extra pile-in, consolidation movement, especially if they were looking to use that movement to hop on an objective. I like thinking of it as a The Curtain Falls lite where you can use it before fighting twice to engage a more opportune target. I envision a solitaire character hunting with this. It will be near impossible to hide from a 25 mil base with the ability to reposition like that.
Destiny’s Jest: During deployment, select one of the following effects to apply until the end of the battle. Alternatively, you can roll two D6 (re-rolling duplicate results) to randomly determine two of the following effects to apply until the end of the battle.
1. +1 to bearer’s Attacks characteristic
2. +1 to the bearer’s Strength characteristic
3. +1 to the bearer’s Toughness characteristic
4. +1 to the bearer’s Wound characteristic
5. +3″ to the bearer’s Move characteristic
6. Improve the Armour Penetration characteristic of the bearer’s melee weapons by 1
• Rating: 2/5
• Use: This feels super fluffy and is very Harlequinesque. This could be used on a Solitaire or Troupe Master to try and soup them up to be more beatstick infantry blenders. Bringing a Solitaire’s caress to S6 can be big in a matchup against toughness 3 armies. A toughest 4 Shadowseer, also becomes exceptionally survivable …
GDFC Strategies and Builds
Brian and I been in the lab throughout this quarantine building lists that revolve around large units of Troupes. Ultimately, we feel this may be one of the most effective ways to run Harlequins and our initial playtesting has confirmed the strengths of building around Troupes as a core. We will offer you two different flavors, a soup option, and a mono-faction Harlequin option, both that we feel are extremely strong.
Both of our builds take advantage of The Curtain Falls, War Dancers, Twilit Encore, as well as all of the utility the Harlequin ruleset has to offer. Overall, we feel that Harlequins will be extremely powerful by playing cagey early on and removing key elements of your opponent’s force with precision, allowing you to set up key plays with The Curtain Falls, and War Dancers that could be absolutely be devastating on the battlefield. All the while, your mobility, and utility allows you to control the board and really dictate the terms of engagement.
These are both lists that could excel at going first or second and offer a ton of flexibility depending on your matchup.
++ Battalion Detachment +5CP (Aeldari – Harlequins) [61 PL, 1,024pts, 8CP] ++
- Configuration +
Battle-forged CP [3CP] Detachment CP [5CP] Masque Form: The Frozen Stars: Hysterical Fury - HQ +
Shadowseer [7 PL, 110pts]: Shield from Harm, Shuriken Pistol, Twilight Pathways, Veil of Tears
Troupe Master [4 PL, 64pts]: Choreographer of War, Power sword, Shuriken Pistol - Troops +
Troupe [12 PL, 188pts] . Player: Harlequin’s Kiss, Shuriken Pistol
. Player: Harlequin’s Kiss, Shuriken Pistol
. Player: Harlequin’s Kiss, Shuriken Pistol
. Player: Harlequin’s Kiss, Shuriken Pistol
. Player: Harlequin’s Kiss, Shuriken Pistol
. Player: Harlequin’s Kiss, Shuriken Pistol
. Player: Harlequin’s Kiss, Shuriken Pistol
. Player: Harlequin’s Kiss, Shuriken Pistol
. Player: Harlequin’s Blade, Shuriken Pistol
. Player: Harlequin’s Blade, Shuriken Pistol
. Player: Harlequin’s Blade, Shuriken Pistol
. Player: Harlequin’s Blade, Shuriken Pistol
Troupe [12 PL, 188pts] . Player: Harlequin’s Caress, Shuriken Pistol
. Player: Harlequin’s Caress, Shuriken Pistol
. Player: Harlequin’s Caress, Shuriken Pistol
. Player: Harlequin’s Caress, Shuriken Pistol
. Player: Harlequin’s Caress, Shuriken Pistol
. Player: Harlequin’s Caress, Shuriken Pistol
. Player: Harlequin’s Caress, Shuriken Pistol
. Player: Harlequin’s Caress, Shuriken Pistol
. Player: Harlequin’s Blade, Shuriken Pistol
. Player: Harlequin’s Blade, Shuriken Pistol
. Player: Harlequin’s Blade, Shuriken Pistol
. Player: Harlequin’s Blade, Shuriken Pistol
Troupe [5 PL, 55pts] . Player: Harlequin’s Blade, Shuriken Pistol
. Player: Harlequin’s Blade, Shuriken Pistol
. Player: Harlequin’s Blade, Shuriken Pistol
. Player: Harlequin’s Blade, Shuriken Pistol
. Player: Harlequin’s Blade, Shuriken Pistol - Elites +
Death Jester [3 PL, 45pts]: Humbling Cruelty
Solitaire [5 PL, 98pts]: Blitz, Cegorach’s Rose, Harlequin’s Caress, Harlequin’s Kiss - Fast Attack +
Skyweavers [13 PL, 276pts] . Skyweaver: Haywire Cannon, Zephyrglaive
. Skyweaver: Haywire Cannon, Zephyrglaive
. Skyweaver: Haywire Cannon, Zephyrglaive
. Skyweaver: Haywire Cannon, Zephyrglaive
. Skyweaver: Haywire Cannon, Zephyrglaive
. Skyweaver: Haywire Cannon, Zephyrglaive
++ Air Wing Detachment +1CP (Aeldari – Craftworlds) [27 PL, 528pts, 1CP] ++ - Configuration +
Craftworld Attribute
. Custom Craftworld: Expert Crafters, Masters of Concealment
Detachment CP [1CP] - Flyer +
Crimson Hunter Exarch [9 PL, 176pts]: Two Starcannons
. Exarch Power: Hawkeye
Crimson Hunter Exarch [9 PL, 176pts]: Two Starcannons
. Exarch Power: Hawkeye
Crimson Hunter Exarch [9 PL, 176pts]: Two Starcannons
. Exarch Power: Hawkeye
++ Spearhead Detachment +1CP (Aeldari – Craftworlds) [30 PL, 446pts, 1CP] ++ - Configuration +
Craftworld Attribute
. Custom Craftworld: Expert Crafters, Masterful Shots
Detachment CP [1CP] - HQ +
Spiritseer [3 PL, 55pts]: 0. Smite, Shuriken Pistol
Spiritseer [3 PL, 55pts]: 0. Smite, Shuriken Pistol - Heavy Support +
Night Spinner [8 PL, 112pts]: Twin Shuriken Catapult
Night Spinner [8 PL, 112pts]: Twin Shuriken Catapult
Night Spinner [8 PL, 112pts]: Twin Shuriken Catapult
++ Total: [118 PL, 10CP, 1,998pts] ++
This is a list I’m extremely excited to continue playtesting and hits just about all of the right notes for my playstyle. It features great mobility, effective long-range firepower, provides board-control, allows me to play cagey, and I can be patient and decide when I want to commit to the field. The list also sports a ton of jankiness that can put a lot of pressure early on.
Crimson Hunter Exarch Airwing Detachment: Pretty self-explanatory. Long-range firepower that can deal damage and zone out the back of my deployment zone. Can net me Recon points for ITC. Also loves taking advantage of Jinx from the Spiritseer.
Night Spinner Spearhead: Same as above. Long-range firepower that can zone out the back of my deployment zone and help apply pressure early-on to net kills. One Spiritseer will provide Jinx support for the Spinners and CHEs, and the other Spiritseer can utilize a combo of Drain, Ennervate, or Restrain – depending on the matchup. Drain and Ennervate are interesting options as they still work cross factions and essentially allow me to protect the Troupes with an additional -1 to hit or -1 to wound.
Frozen Stars Battalion: Here’s the meat and potatoes of the list. The typical game plan is to apply early pressure with the CHEs, Night Spinners, and Skyweavers. The Skyweavers can also be candidates for Turn 1 charges with Twilight Pathways and The Curtain Falls to be an absolute annoyance. When the timing is right, the list then turns to the two large units of Troupes, which can take advantage of The Curtain Falls, and War Dancers to do significant damage to my opponent and control the board while mitigating damage in return by using The Curtain Falls to bounce in and out of combat/utilize terrain and flippy belts to protect the Troupes, or tying key units with Twilit Echo and Humbling Cruelty.
The Death Jester will almost always have Humbling Cruelty. The option for the Pivotal Role Stratagems typically goes to the Troupe Master and Shadowseer depending on the matchup.
Depending on whether I value more offensive punch or defensive lasting power, the Warlord will either be the Troupe Master for the double Light setup and can even be handed the Twilight Fang or the Shadowseer utilizing Player of the Twilight for some CP regen.
Cegorach’s Rose will be a go-to relic most games, but The Shadowstone, Twilight Fang, Cegorach’s Lament, Suit of Hidden Knives, could all be viable options depending on the matchup.
Given the list only starts with 10 CP, it is important to be very cautious with pre-game CP expenditures. Fortunately, the Craftworlds detachments do not require much CP support to accomplish their roles.
71 Troupe Master: power sword, fusion pistol
110 Shadowseer: pivotal role: Veil of Illusion
110 Shadowseer
90 Troupex5:3xkiss,2xfusion pistol
90 Troupex5:3xkiss,2xfusion pistol
188 Troupex12: 8xcaress
181 Troupex12: 7xkiss
55 Troupex5
55 Troupex5
45 Death Jester: Pivotal Role: Humbling Cruelty
45 Death Jester: Pivotal Role: Harvester of Torment
98 Solitaire
270 Skyweaverx6: 5xzephyrglave,haywire cannon, 1xstar bolas
80 Skyweaverx2: 2xstar bolas,haywire cannon
80 Skyweaverx2: 2xstar bolas,haywire cannon
90 Voidweaver: prismatic cannon
90 Voidweaver: prismatic cannon
90 Voidweaver: prismatic cannon
80 Starweaver
80 Starweaver
This at its core is the list I was running prior to the Psychic Awakening Update. The shock assault update for marines has really given Harlequins a hard time, and I have been advocating for people to shift to large Troupe squads to get work done. There is nothing more capable of offensive output as a well supported Troupe squad. They can also be surprising durable with Prismatic Blur and Veil of Tears on them, especially if you have a Shadowseer nearby for Shield from Harm/Veil of Illusion. This list focuses on skirmishing early with the S6 firepower and haywire in the list while setting up the large Troupe Units for a critical fight twice utilizing The Curtain Falls and War Dancers.
Silent Shroud is a sleeper faction in my eyes. I choose it for two reasons (besides silent killer clowns scaring the crap out of me):
1) The Silken Knife lets any of my units ignore overwatch for 2 CP. This is critical for maximizing what you can declare charges on with a large troupe squad to really get the most out of fighting twice. It will not come up every game, but it is absolutely essential when it does.
2) The Troupe’s really do need the Troupe Master support to really make them effective and The Scintillant Veil is amazing for this. With a brigade I can often budget for the Great Harlequin for my Troupe Master. I will usually make him a Player of Light and with the new Prince of Light he will be putting out the following auras: re-roll hit rolls of 1 in combat, re-roll wound rolls, re-roll charge rolls, and +1 to charge. All of those auras will operate at 9″ which is important since your clowns will be dancing around everything with The Curtain Falls. You do have to be careful of character snipers potentially removing a lot of power from your list, but this adds amazing consistency to being able to pull off the devastating plays.
I am also a big fan of the brigade since it provides a lot of CP to utilize many of the Harlequin’s best tricks. The Voidweavers and 2 man Skyweaver Jetbike squads also provide amazing tools for zoning out deepstrikers (like troublesome Deathwatch Veterans) as well as reliably scoring recon, behind enemy lines, and other maneuver secondaries. Elite armies can struggle with having units to screen or hold the middle objectives early, but these do that job exceptionally well. Voidweavers are also great at helping pickup the the spare wound on a vehicle if the haywire can’t quite finish it off. The Voidweavers are also a big part of the list’s 42 S6 shots it puts downfield. This really lets you play more patiently with the Troupe squads, waiting for the right time to strike, or even placing them in the webway. Veil of Illusion is amazing in this regard as well forcing your opponents towards you to shoot. I also cannot stress how much it helps against the small arms fire that would normally be detrimental to a pure Harlequins army.
Overall Harlequins are very strong. I’ve been fortunate enough to get a few practice games in with the new rules to devastating effect. I encourage any macabre minded individual to get out there and start experimenting because there really is a lot to unpack from this White Dwarf.
Additional Builds
• Skyweaver Spam: 3 units of 6 Soaring Spite Skyweavers that can double prismatic blur for that sweet 3++ on both units (once in the movement phase, and once in the psychic phase), one unit taking advantage of The Curtain Falls to strategically pick apart isolated enemy units and bounce 16″ away while being protected by Veil of Illusion and Shield from Harm with the Foes of the Mind stratagem can mulch vehicles and screens with Haywire, and take on Primaris with their Zephyrglaives. All the while, being incredibly durable with -1 to hit, -1 to wound, and 3++ saves. This list will feast on CP, but if you keep those Skyweavers around for 3 turns, the amount of chaos and damage they can cause is incredible.
• Clown Car Spam: The traditional Starweaver spam type of list just got even stronger by increasing their durability with the Shadowseer’s defensive abilities. This list could be very similar to current Venom spam, with a longer shelf life by keeping the clown cars under the Shadowseer’s protective aura. The Shadowstone becomes a very powerful relic in this build.
• Traditional Mixed Detachment Soup: The tried and true mixed detachment including a Shadowseer, 2 Death Jesters, and a Solitaire just got even more powerful with all of the increased utility. You can also toss in a unit of Skyweavers, as I do, for good measure. In one of my other competitive lists, I combine this detachment with a Prophets of Flesh Coven Battalion with six Talos and the triple Ravager Spearhead. This list just got even more powerful as the Coven detachment doesn’t really use CP, and other than Agents of Vect, all of the CP can feed the Harlequins.
Bmoy's 2,000 Point Coven/Quins List
++ Spearhead Detachment +1CP (Aeldari – Drukhari) [25 PL, 477pts, ] ++
- Configuration +
Detachment CP [1CP] Detachment Type: Kabal of the Black Heart - Stratagems +
Alliance of Agony [-1CP] - HQ +
Archon [4 PL, 57pts]: Labyrinthine Cunning, Splinter pistol, Venom Blade, Warlord, Writ of the Living Muse - Heavy Support +
Ravager [7 PL, 140pts]: Disintegrator cannon, Disintegrator cannon, Disintegrator cannon
Ravager [7 PL, 140pts]: Disintegrator cannon, Disintegrator cannon, Disintegrator cannon
Ravager [7 PL, 140pts]: Disintegrator cannon, Disintegrator cannon, Disintegrator cannon
++ Vanguard Detachment +1CP (Aeldari – Harlequins) [31 PL, 568pts, ] ++ - Configuration +
Detachment CP [1CP] Masque Form: The Soaring Spite: Serpent’s Blood - Stratagems +
Enigmas of the Black Library (1 Relic) [-1CP] - HQ +
Shadowseer [7 PL, 110pts]: Shards of Light, Shuriken Pistol, Twilight Pathways - Elites +
Death Jester [3 PL, 45pts] Death Jester [3 PL, 45pts] Solitaire [5 PL, 98pts]: Cegorach’s Rose, Harlequin’s Caress, Harlequin’s Kiss - Fast Attack +
Skyweavers [13 PL, 270pts] . Skyweaver: Haywire Cannon, Zephyrglaive
. Skyweaver: Haywire Cannon, Zephyrglaive
. Skyweaver: Haywire Cannon, Zephyrglaive
. Skyweaver: Haywire Cannon, Zephyrglaive
. Skyweaver: Haywire Cannon, Zephyrglaive
. Skyweaver: Haywire Cannon, Star Bolas
++ Battalion Detachment +5CP (Aeldari – Drukhari) [59 PL, 955pts, 7CP] ++ - Configuration +
Battle-forged CP [3CP] Detachment CP [5CP] Detachment Type: Prophets of Flesh - Stratagems +
Prizes from the Dark City (1 Relic) [-1CP] - HQ +
Haemonculus [5 PL, 72pts]: Diabolical Soothsayer, Splinter pistol, Venom Blade
Urien Rakarth [5 PL, 90pts] - Troops +
Wracks [5 PL, 88pts] . Acothyst: Haemonculus tools
. Wrack with special weapon (up to 1 for 5 models): Ossefactor
. 7x Wracks
Wracks [5 PL, 72pts] . Acothyst: Haemonculus tools
. 7x Wracks
Wracks [3 PL, 45pts] . Acothyst: Haemonculus tools
. 4x Wracks - Heavy Support +
Talos [12 PL, 196pts] . Talos: Chain-Flails, Macro-Scalpel
. . Two Haywire Blasters: 2x Haywire blaster
. Talos: Chain-Flails, Macro-Scalpel
. . Two Haywire Blasters: 2x Haywire blaster
Talos [12 PL, 196pts] . Talos: Chain-Flails, Macro-Scalpel
. . Two Haywire Blasters: 2x Haywire blaster
. Talos: Chain-Flails, Macro-Scalpel
. . Two Haywire Blasters: 2x Haywire blaster
Talos [12 PL, 196pts] . Talos: Chain-Flails, Macro-Scalpel
. . Two Haywire Blasters: 2x Haywire blaster
. Talos: Chain-Flails, Macro-Scalpel
. . Two Haywire Blasters: 2x Haywire blaster
++ Total: [115 PL, 7CP, 2,000pts] ++
Closing Thoughts
Overall, we couldn’t be more excited for the Harlie’s new rules from Psychic Awakening. I already have a feeling they might be a bit overpowered and will need to be slightly tuned (e.g. The Curtain Falls at the end of the Fight Phase instead of after you fight). Their ruleset feels very Ynnari 2.0 to me, and with how much jank, movement, and overall utility – there could be a lot of salt when playing against Harlequins. I would not be surprised to see the Aeldari at top tables once tournaments resume and even mono-faction Harlequins being a strong contender.
What are your thoughts on the new Harlequins and how will you be running them?
If you’re interested in joining our Discord community to join the conversation, feel free to reach out to us at grimdarkfilthycasuals@gmail.com. Comment below with any thoughts you may have and please follow us on the usual platforms to stay up-to-date with all of the latest releases from GDFC.
- Twitter: @GDFilthyCasuals
- Instagram: grimdarkfilthycasuals
- Facebook: grimdarkfilthycasuals
- Youtube: GDFC Youtube Channel

is the founder of Grim Dark Filthy Casuals, Assistant to the Editor in Chief, Author, Content Director, Resident Emo Aeldari Player, and Chief Filthy Casual
Stike
I don’t get it with “The Curtain Falls”. You consolidate after the attacks from the enemy… so why you call it: bouncing off, before the enemy hits you?
Brian Moy
The wording of TCF says that until the end of the phase, instead of consolidating that unit can fall back or move as if it were your movement phase (but cannot advance).
If you’ve charged, you consolidate before your enemy gets to activate a unit to fight, so you can move as if it were your movement phase (meaning ignoring models and terrain) to get your full movement anywhere you’d like (not towards the closest enemy model).
Tons of applications for this. Hope this helps!
Scott Beech
Great article, very information, just a little note, without advancing all the weaver units move 14 not 16 …. it’s dumb considering the speed of craftworld bikes, but there you go. Also can anyone tell me why craftworlders get battlefocus and quins don’t?!?!?!?
Brian Moy
Thanks for the reply Scott! I believe all the Weaver units have a base movement of 16″ with the Blur of Colour ability giving it an auto 6″ advance. Harlies get the Rising Crescendo ability which is much more fitting to their playstyle which allows them to Advance and Charge, as well as Fall Back and still shoot and/or charge. The Soaring Spite masque essentially is the battle focus ability as they ignore the penalty to hit rolls for shooting assault weapons when they advance.
ปั้มไลค์
Like!! Thank you for publishing this awesome article.